沒有光碟機也能裝系統!準備 4GB 以上 USB 隨身碟、Win7 原版 ISO 鏡像、UltraISO 軟體,即可製作開機隨身碟並安裝 Windows 7。
準備資源
- Win7 原版鏡像 (MSDN/官方):
- 64 位元旗艦版:
ed2k://|file|cn_windows_7_ultimate_with_sp1_x64_dvd_u_677408.iso|3420557312|B58548681854236C7939003B583A8078|/
- 32 位元旗艦版:
ed2k://|file|cn_windows_7_ultimate_with_sp1_x86_dvd_u_677486.iso|2653276160|7503E4B9B8738DFCB95872445C72AEFB|/
- UltraISO:寫入鏡像至 USB。
製作與安裝流程
- UltraISO 寫入:開啟 ISO → 「啟動」→ 「寫入硬碟映像」→ 選擇 USB 裝置 → 寫入模式「USB-HDD+」→ 格式化並寫入。
- BIOS 設定:USB 插入 USB 2.0 埠 (3.0 可能安裝報錯) → 開機進 BIOS 將 USB 設為第一啟動順序。
- 安裝系統:重開機進入安裝程式,按提示下一步,注意選擇安裝磁碟分割與大小。
- 啟用系統:安裝完成後使用 Windows Loader 永久啟用。
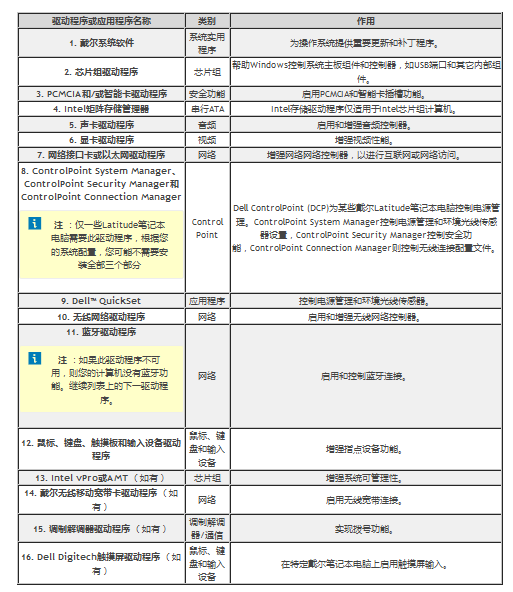
- 安裝驅動:勿用驅動精靈/驅動人生,請至筆電/主機板官網下載對應型號驅動,並按順序安裝 (如 Dell 晶片組→顯卡→聲音→網卡…),否則易出錯。
教程實用完整,收藏備用,系統壞了自己就能裝!