Windows XP Windows 7 Windows 2003 Windows Vista Windows 綜合教學 Linux 系統教學
Windows 10 Windows 8 Windows 2008 Windows NT Windows Server 電腦軟體教學

Win 8.1 桌面右下角「Secure Boot 未正確配置」水印移除教學

編輯:Win8 系統應用技巧

採用 UEFI 模式安裝 Windows 8.1 時,若主機板 BIOS/UEFI 中的 Secure Boot(安全開機)未啟用或金鑰未正確載入,進入桌面右下角會顯示半透明水印:「Secure Boot 未正確配置」。此為 Windows 驗證開機信任鏈失敗的提示,不影響系統功能,但影響美觀與安全性指標。

BIOS/UEFI 設定修正步驟(以常見 AMI/Insyde 介面為例)

1. 進入 BIOS 設定 Secure Boot 模式為 Custom

開機連續點擊 Del/F2/F10 進入 BIOS,尋找 Security 或 Boot 分頁下的 Secure Boot Mode,將預設 Standard 改為 Custom,才能編輯金鑰。
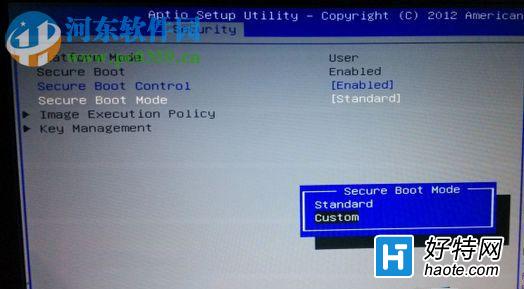
Secure Boot Mode 改為 Custom

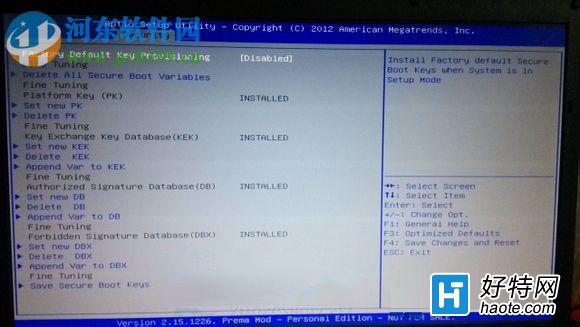
2. 安裝原廠預設金鑰

  • 進入 Key Management(金鑰管理)。
  • 選擇 Install All Factory Default Keys(安裝所有原廠預設金鑰),確認選 Yes。
  • 執行完成後,PK、KEK、db、dbx 等項目右側狀態應顯示 Installed。

安裝預設金鑰

3. 恢復 Standard 模式並儲存重啟

返回上層選單,將 Secure Boot Mode 改回 Standard,按 F10 Save & Exit 重啟。進入桌面後水印即消失。

原理說明

UEFI Secure Boot 需要平台金鑰 (PK)、金鑰交換金鑰 (KEK)、簽名資料庫 (db) 與撤銷資料庫 (dbx) 完整建立信任鏈。預裝 Windows 的裝置出廠時已寫入,但手動重灌或清除 BIOS 設定可能導致金鑰遺失。Install All Factory Default Keys 會從主機板儲存區重新載入微軟與 OEM 簽署的金鑰,重建信任鏈,Windows 開機驗證通過,水印自然消失。


注意事項

  • 操作前建議備份 BIOS 設定(部分主機板支援 Profile 匯出)。
  • 若主機板不支援 Custom 模式或無 Factory Default Keys 選項,請洽廠商技支或更新 BIOS 版本。
  • 雙系統(Linux)用戶:啟用 Secure Boot 可能導致未簽署的 GRUB/核心無法開機,需使用支援 Secure Boot 的載入器(如 shim + GRUB2 簽名版)。
Copyright © Windows教程網 All Rights Reserved