Windows XP Windows 7 Windows 2003 Windows Vista Windows 綜合教學 Linux 系統教學
Windows 10 Windows 8 Windows 2008 Windows NT Windows Server 電腦軟體教學

Win8.1 安裝 Intel HAXM 失敗?開啟 DEP + 關閉 Hyper-V (bcdedit) 解決衝突

編輯:Windows 8 系統介紹

Intel HAXM (Hardware Accelerated Execution Manager) 是 Android 模擬器硬體加速引擎。Win8.1 安裝失敗常因:DEP (資料執行保護) 未啟用 或 Hyper-V 已啟用 佔用虛擬化資源。依序開啟 DEP、關閉 Hyper-V 即可安裝成功。
解決步驟

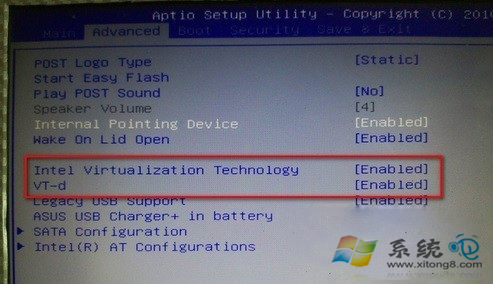
  1. 確認 CPU 支援虛擬化 (VT-x/AMD-V) 且 BIOS 已啟用 (工作管理員→效能→CPU→虛擬化:已啟用)。
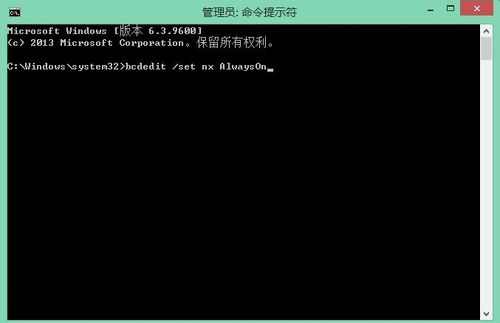
  2. 開啟 DEP: 管理員 CMD 執行:
    bcdedit.exe /set nx AlwaysOn
    (關閉 DEP 為 bcdedit.exe /set nx AlwaysOff)
  3. 關閉 Hyper-V: 管理員 CMD 執行:
    bcdedit /set hypervisorlaunchtype off
    (啟用 Hyper-V 為 bcdedit /set hypervisorlaunchtype auto)
    重新開機。
  4. 重新執行 intelhaxm-android.exe 安裝,應可成功。同步解決 VirtualBox 提示「需暫時關閉核心隔離/記憶體完整性」問題。

原理說明

  • HAXM 需獨佔 CPU 虛擬化擴充功能 (VT-x/AMD-V),Hyper-V 啟用時會佔用該資源導致衝突。
  • DEP (NX/XD bit) 為硬體層級緩衝區溢位保護,HAXM 依賴 DEP 正常運作,Win8.1 預設可能為 OptIn 模式 (僅系統程式),需強制 AlwaysOn。

替代方案

若需同時使用 Hyper-V (Docker、WSL2、Android Emulator Hyper-V 模式) 與 HAXM,無法雙立。建議:
• Android Studio 改用 Android Emulator Hyper-V 模式 (需 API 29+、Windows 10 1903+)。
• 或雙系統/虛擬機隔離開發環境。


Copyright © Windows教程網 All Rights Reserved