Windows XP Windows 7 Windows 2003 Windows Vista Windows 綜合教學 Linux 系統教學
Windows 10 Windows 8 Windows 2008 Windows NT Windows Server 電腦軟體教學

Win10 如何移除右鍵選單「Windows Defender 掃描」項目?刪除登錄 EPP 金鑰淨化右鍵選單

編輯:Windows 10 系統介紹

Windows Defender 安裝後會在檔案/資料夾右鍵選單加入「掃描」項目,易誤觸且佔用空間。刪除登錄中兩處 EPP 金鑰可徹底移除此項目。

移除步驟

  1. Win+R > regedit 開啟登錄編輯器。
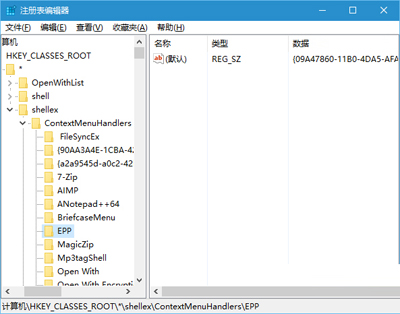
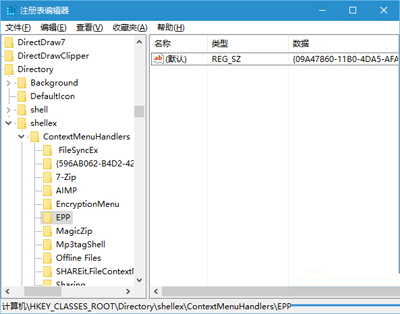
  2. 瀏覽並刪除以下兩個金鑰(右鍵 > 刪除):
    HKEY_CLASSES_ROOT\*\shellex\ContextMenuHandlers\EPP
    HKEY_CLASSES_ROOT\Directory\shellex\ContextMenuHandlers\EPP
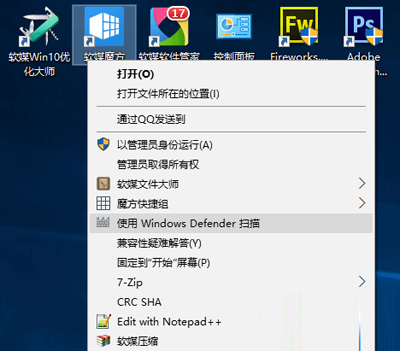
  3. 重新開機或重啟檔案總管生效。

右鍵選單 Windows Defender 掃描

刪除 HKEY_CLASSES_ROOT\*\shellex\ContextMenuHandlers\EPP

刪除 HKEY_CLASSES_ROOT\Directory\shellex\ContextMenuHandlers\EPP
恢復方法

重建上述兩個 EPP 金鑰,並將預設字串值設為 {09A47860-11B0-4DA5-AFA5-26D86198A780},重開機即可恢復右鍵掃描項目。

此法同樣適用於移除其他第三方防毒軟體殘留的右鍵選單項目(金鑰名稱不同)。修改登錄前建議匯出備份相關分支。

Copyright © Windows教程網 All Rights Reserved