Windows XP Windows 7 Windows 2003 Windows Vista Windows 綜合教學 Linux 系統教學
Windows 10 Windows 8 Windows 2008 Windows NT Windows Server 電腦軟體教學
您现在的位置: Windows教程網 >> Windows教程 >  >> Windows 綜合教學 >> 關於 Windows

Win7 新增網路印表機失敗(錯誤:列印處理器不存在)?補充 Winprint.dll 與註冊表修復

編輯:關於 Windows

Win7 加入網路印表機提示「印表機無法安裝」或「列印處理器不存在」,主因是系統缺少 Winprint.dll 或註冊表列印處理器機碼遺失。補充檔案與機碼即可解決。

修復步驟

  1. 檢查系統檔案是否存在:
    64 位元:C:\Windows\System32\spool\prtprocs\x64\Winprint.dll
    32 位元:C:\Windows\System32\spool\prtprocs\w32x86\Winprint.dll

    若無,從相同版本 Win7 系統複製此檔至對應目錄。
  2. 按 Win+R 輸入 regedit 開啟註冊表。
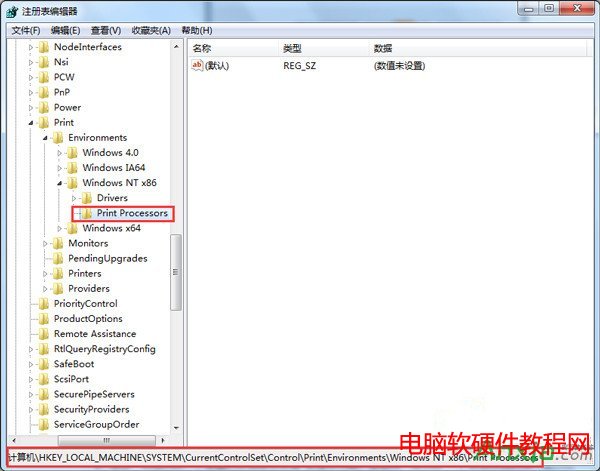
  3. 定位至:HKEY_LOCAL_MACHINE\SYSTEM\CurrentControlSet\Control\Print\Environments\Windows NT x86\Print Processors(64 位元為 Windows x64)。
  4. 若無 winprint 子機碼,右鍵→新增→機碼,命名 winprint。
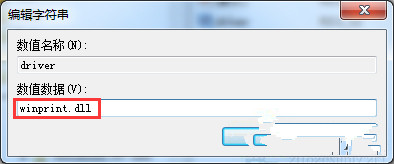
  5. 選取 winprint,右側空白處右鍵→新增→字串值,命名 Driver,數值資料設為 winprint.dll。
  6. 重新啟動 Print Spooler 服務(或重開機),再次新增網路印表機即可成功。

適用情境:系統精簡版、Ghost 版、或使用優化工具誤刪列印相關元件導致的網路印表機安裝失敗。

Copyright © Windows教程網 All Rights Reserved