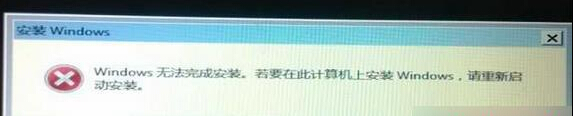
Win7 安裝中後期報錯:「Windows 無法更新電腦的啟動配置,安裝無法繼續」,核心原因:**MBR/BCD 衝突、保留分區殘留、安裝媒體未拔除導致啟動順序錯誤**。
解決方案
- 刪除 200/350/500 MB 系統保留分區 + 重建 MBR(最徹底):
- PE 下用 DiskGenius:選磁碟 → 「刪除所有分區」 → 「快速分區」(勾選「建立 MBR」/「建立 ESP 分區」視模式) → 重新安裝。
- 或安裝畫面「磁碟管理」介面:按 Shift+F10 開 CMD → `diskpart` → `select disk 0` → `clean` → `create partition primary` → `active` → `format fs=ntfs quick` → `exit` → 重新整理繼續安裝。
- Ghost/映像部署後修復引導:
- 映像還原到 C: 後,PE 下用 `bootsect /nt60 C: /mbr` + `bcdboot C:\Windows /l zh-tw /s C: /f BIOS` 重建啟動檔案。
- 拔除安裝媒體(U盤/光碟):
- 檔案複製完成、首次重啟前**立即拔除 U 盤/取出光碟**,或進 BIOS 將硬碟設為第一啟動順序。避免從安裝媒體啟動進入安裝程式循環。
預防建議
- 安裝前**備份資料、確認硬碟健康**。
- 使用 **純淨官方 ISO + Ventoy/Rufus** 製作啟動媒體,避免 Ghost 系統帶來的驅動/引導問題。
- 新機型(Skylake 以後)建議直接安裝 Windows 10/11,原生支援 NVMe/USB 3.x/現代晶片組。