Windows XP Windows 7 Windows 2003 Windows Vista Windows 綜合教學 Linux 系統教學
Windows 10 Windows 8 Windows 2008 Windows NT Windows Server 電腦軟體教學

刪除 Win10 檔案總管導覽窗格中 Creative Cloud 資料夾教學

編輯:Windows 10 系統介紹

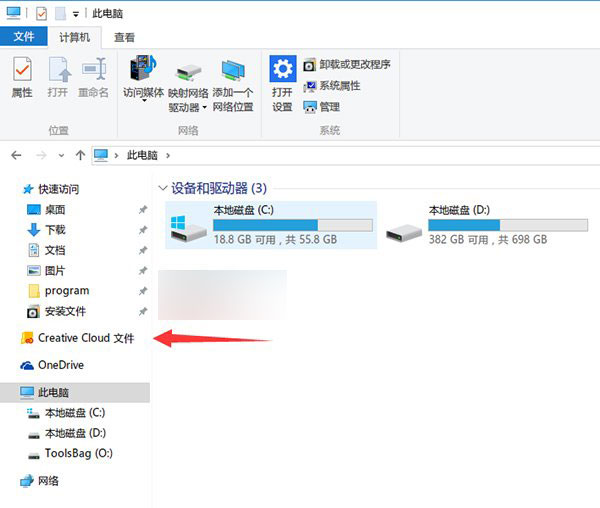
Adobe Creative Cloud 桌面版更新後,會在檔案總管左側導覽窗格固定顯示「Creative Cloud Files」資料夾。若不使用雲端同步功能,可透過登錄隱藏此項目,不影響 CC 應用程式本體運作。
登錄修改步驟

  1. 執行 regedit 開啟登錄編輯器。
  2. 瀏覽至路徑 (用戶 SID 部分因帳號而異):
    HKEY_USERS\S-1-5-21-...\Software\Classes\CLSID\{0E270DAA-1BE6-48F2-AC49-F7A03EB7D1CF}
  3. 在右側找到 System.IsPinnedToNameSpaceTree 值 (DWORD),預設為 1 (顯示)。
  4. 雙擊修改數值資料為 0 (隱藏)。

生效方式

  • 修改後立即生效,無需重啟檔案總管、無需重開機。
  • 若未生效,按 Ctrl+Shift+Esc 重新啟動「Windows Explorer」進程。

恢復顯示

將 System.IsPinnedToNameSpaceTree 改回 1 即可。

適用範圍

測試環境:Windows 10 正式版。其他版本 (Win8.1、Win11) 同樣適用於同一 CLSID 登錄機制。

Copyright © Windows教程網 All Rights Reserved