許多網友詢問如何製作整合 32 位與 64 位版本的 Windows 7 旗艦版多合一安裝鏡像。其實基於原版 ISO 製作多合一鏡像流程並不複雜,關鍵在於熟悉命令列工具 DISM、ImageX 與 Oscdimg 的操作。本文系統整理核心命令、注意事項與實際操作範例,助您從入門到精通。
三款工具皆可從 Windows ADK for 8.1 線上安裝時勾選「部署工具」取得,安裝後位於 C:\Program Files (x86)\Windows Kits\8.1\Assessment and Deployment Kit\Deployment Tools。
cd /d 目標路徑 切換至工具目錄,或將工具目錄加入系統 PATH 環境變數。工具名 /參數1 /參數2 ...,斜線前需有一空格,全半形字元。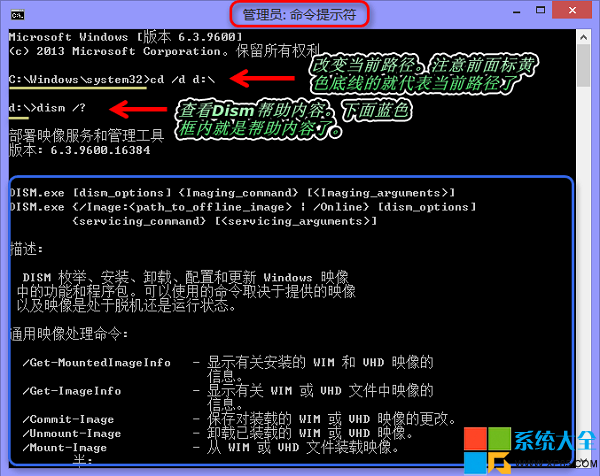
dism /get-imageinfo /imagefile:I:\sources\install.wim
可取得索引編號、名稱、描述等資訊。
dism /delete-image /imagefile:F:\install.wim /index:1
需先將 install.wim 複製到硬碟,不可在虛擬光碟機直接操作。
imagex /info F:\install.wim 1 "Windows 8 企業版 [32位]" "Windows 8 Enterprise 32bit"
同一 WIM 內不允許重複名稱。
Dism /export-image /sourceimagefile:I:\sources\install.wim /sourceindex:1 /destinationimagefile:F:\install.wim /destinationname:"Windows 8 企業版 [64位]"
/Compress:maximum 達到最高壓縮率。/destinationname 則保留原名稱。dism /mount-image /imagefile:F:\install.wim /index:1 /MountDir:E:\Win8dism /image:E:\Win8 /get-targeteditionsdism /image:E:\Win8 /set-edition:ProfessionalWMCdism /unmount-wim /mountdir:E:\Win8 /commitsources\ei.cfg;Win8/8.1 需新增 ei.cfg。Dism /Split-Image /ImageFile:F:\install.wim /SWMFile:D:\image\install.swm /FileSize:4096僅 BIOS 模式:
Oscdimg -betfsboot.com -m -u2 -h -udfver102 -lHRM_CCSA_X64FRE_ZH-CN_DV5 -t8/22/2013,22:22:22 E:\isox64 E:\MyISO.iso
BIOS + UEFI 雙模式:
Oscdimg -bootdata:2#p0,e,bEtfsboot.com#pEF,e,bEfisys.bin -m -u2 -h -udfver102 -lHRM_CCSA_X64FRE_ZH-CN_DV5 -t8/22/2013,22:22:22 E:\isox64 E:\MyISO.iso
D:\Win7,刪除 D:\Win7\sources\install.wim 與 ei.cfg。x86、amd64 至 D:\。cd /d D:\x86 Dism /export-image /sourceimagefile:E:\sources\install.wim /sourceindex:5 /destinationimagefile:D:\Win7\sources\install.wim /compress:maximum imagex /info D:\Win7\sources\install.wim 1 "Windows 7 旗艦版 [32位]" "Windows 7 Ultimate 32bit" Dism /export-image /sourceimagefile:F:\sources\install.wim /sourceindex:4 /destinationimagefile:D:\Win7\sources\install.wim imagex /info D:\Win7\sources\install.wim 2 "Windows 7 旗艦版 [64位]" "Windows 7 Ultimate 64bit" Oscdimg -betfsboot.com -m -u2 -h -udfver102 -lGSP1RMCULFRER_ZH-CN_DVD -t8/22/2013,22:22:22 D:\Win7 D:\MyWin7.iso
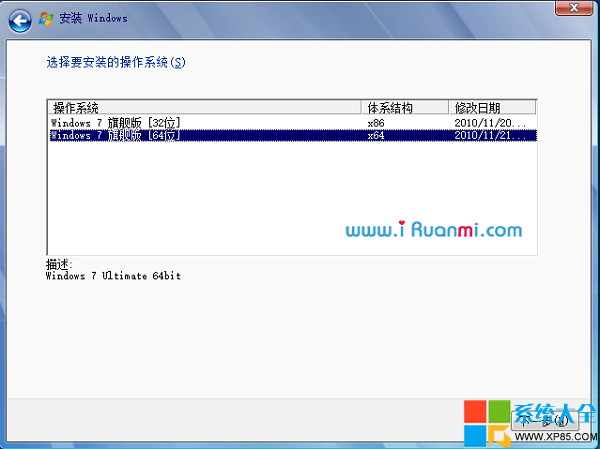
完成後即獲得 D:\MyWin7.iso,可直接燒錄或寫入 USB 安裝。