Windows XP Windows 7 Windows 2003 Windows Vista Windows 綜合教學 Linux 系統教學
Windows 10 Windows 8 Windows 2008 Windows NT Windows Server 電腦軟體教學

Windows XP OEM 資訊自訂三步走:建立 oeminfo.ini + oemlogo.bmp → 自解壓封裝 → 安裝生效

編輯:Windows XP 系統介紹

下載版 XP 安裝後顯示他人 OEM 資訊?三步自訂屬於你的製造商名稱與 Logo,無需修改登錄、無需第三方工具。

步驟一:準備 OEM 資訊檔案

  1. 記事本建立 oeminfo.ini:
[Version]
Microsoft Windows Whistler Edition
WinVer=5.01

[General]
Manufacturer=你的品牌名稱 (如 MyCustomPC)
  1. 準備 160×120 像素、24-bit BMP 圖片,重命名為 oemlogo.bmp。

步驟二:封裝成自解壓執行檔

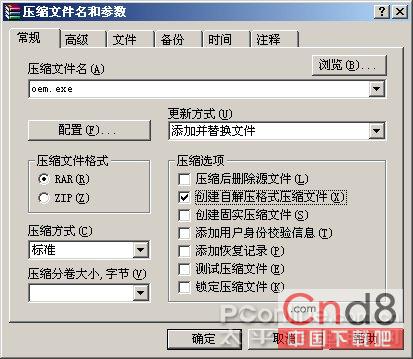
  1. 選取兩檔 → 右鍵「加入壓縮檔」(WinRAR/7-Zip/頻帶壓縮)。
  2. 檔名:oem.exe → 勾選「建立自解壓檔」。
  3. 「進階」頁籤 →「自解壓選項」→ 解壓路徑:C:\WINDOWS\system32 → 確定。

WinRAR 自解壓選項設定

步驟三:安裝生效

  1. 雙擊 oem.exe →「安裝」/「解壓」。
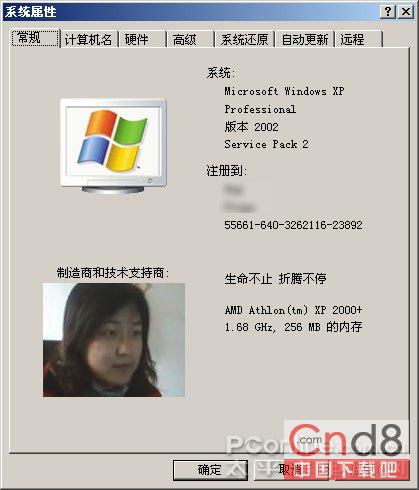
  2. 右鍵「我的電腦」→「內容」→「一般」頁籤 → 即見自訂製造商與 Logo。

系統內容顯示自訂 OEM 資訊

進階:完整 oeminfo.ini 範本

[Version]
Microsoft Windows Whistler Edition
WinVer=5.01

[General]
Manufacturer=MyCustomPC
Model=Custom Build 2024
SupportURL=https://mycustompc.example.com
SupportHours=週一至週五 09:00-18:00
SupportPhone=+886-2-1234-5678
LogoPath=C:\WINDOWS\system32\oemlogo.bmp

注意事項

  • 圖片必須 160×120、24-bit BMP,超過尺寸會變形或不顯示。
  • 解壓路徑必須為 %windir%\system32,系統讀取固定路徑。
  • 修改後需重新整理 (F5) 或重新開啟「系統內容」才會顯示。
  • 此法僅影響「系統內容」視覺呈現,不改變實際授權狀態。
Copyright © Windows教程網 All Rights Reserved