問題背景
Windows 內建時間同步功能預設間隔為 7 天(604,800 秒),對於需要精確時間的應用(如資料庫同步、日誌分析、金融交易)顯然不足。本文說明如何修改同步頻率。
操作步驟
步驟 1:確認基礎同步正常
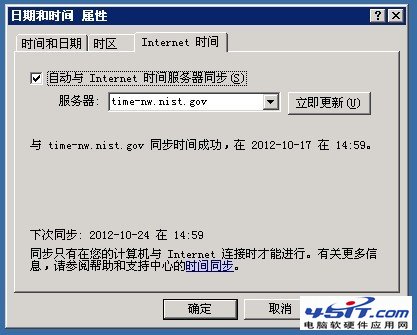
- 開啟「日期和時間屬性」→「網際網路時間」分頁
- 勾選「自動與網際網路時間伺服器同步」
- 選擇時間伺服器(如
time.windows.com 或國內 NTP 伺服器)
- 點擊「立即更新」,確認同步成功
步驟 2:修改登錄檔調整間隔
- 執行
regedit 開啟登錄編輯器
- 瀏覽至路徑:
HKEY_LOCAL_MACHINE\SYSTEM\CurrentControlSet\Services\W32Time\TimeProviders\NtpClient
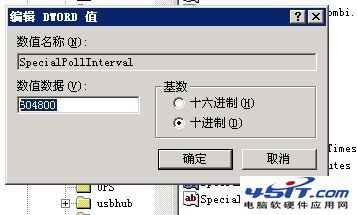
- 找到 SpecialPollInterval 值(預設十進位 604800 = 7天)
- 修改為所需秒數,例如:
- 1 小時 = 3600
- 6 小時 = 21600
- 1 天 = 86400
- 確認修改
步驟 3:重啟服務生效
在「服務」中重啟 Windows Time 服務,或直接重啟伺服器。
補充建議
- 生產環境建議同步至內部 NTP 伺服器,減少外網依賴
- 可配合排程任務定期檢查時間偏移量
- Windows Server 2008 以上版本建議使用群組原則統一管理