針對無光驅、無 USB、批量裸機服務器場景,通過 PXE 網絡啟動 + Kickstart 自動應答實現 CentOS/RHEL/Rocky/AlmaLinux 完全無人值守安裝。本文記錄 DHCP/TFTP/HTTP 服務搭建、PXE 菜單構建、Kickstart 文件精簡、驗證流程的完整實戰步驟。
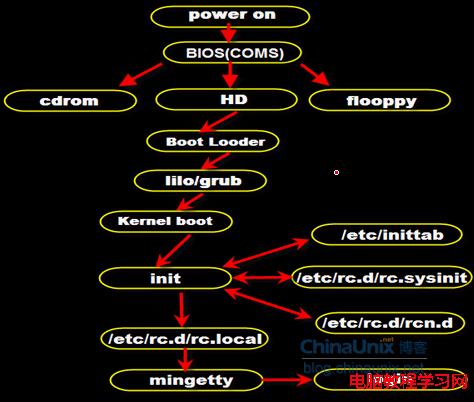
客戶機 BIOS/UEFI → PXE ROM → DHCP 獲取 IP + next-server + filename
                    → TFTP 下載 pxelinux.0 / grubx64.efi
                    → 載入內核 vmlinuz + initrd.img
                    → 啟動安裝程序 → 讀取 Kickstart (ks.cfg) 自動分區/安裝/配置
                    → 重啟進入系統
# 安裝
yum install dhcp-server -y

# /etc/dhcp/dhcpd.conf
option domain-name "pxe.local";
option domain-name-servers 192.168.100.10;
default-lease-time 600;
max-lease-time 7200;
authoritative;

subnet 192.168.100.0 netmask 255.255.255.0 {
    range 192.168.100.100 192.168.100.200;
    option routers 192.168.100.1;
    option broadcast-address 192.168.100.255;
    next-server 192.168.100.10;           # TFTP 服務器 IP
    filename "pxelinux.0";                 # BIOS 啟動文件
    # UEFI 區分 (需配合 class)
    class "pxeclients" {
        match if substring(option vendor-class-identifier, 0, 9) = "PXEClient";
        filename "pxelinux.0";
    }
}

# 針對特定 MAC 固定 IP (可選)
host node01 {
    hardware ethernet 00:0c:29:xx:xx:xx;
    fixed-address 192.168.100.50;
    filename "pxelinux.0";
}

# 啟用
systemctl enable --now dhcpd
# 安裝
yum install tftp-server syslinux -y

# /etc/xinetd.d/tftp
service tftp
{
    socket_type = dgram
    protocol = udp
    wait = yes
    user = root
    server = /usr/sbin/in.tftpd
    server_args = -s /var/lib/tftpboot -v
    disable = no
    per_source = 11
    cps = 100 2
    flags = IPv4
}

# 目錄結構
mkdir -p /var/lib/tftpboot/{pxelinux.cfg,images/centos9}
cp /usr/share/syslinux/pxelinux.0 /var/lib/tftpboot/
cp /usr/share/syslinux/{menu.c32,vesamenu.c32,libutil.c32,libcom32.c32} /var/lib/tftpboot/

# 復制安裝內核 (從 ISO 掛載)
mount -o loop CentOS-9-stream-x86_64-dvd.iso /mnt
cp /mnt/images/pxeboot/{vmlinuz,initrd.img} /var/lib/tftpboot/images/centos9/

# 啟用 xinetd
systemctl enable --now xinetd
# 安裝
yum install httpd -y

# 將 ISO 內容完整發布
mkdir -p /var/www/html/centos9
cp -r /mnt/* /var/www/html/centos9/
# 或掛載循環
mount -o loop,ro CentOS-9-stream-x86_64-dvd.iso /var/www/html/centos9

# Kickstart 文件 /var/www/html/centos9/ks.cfg
# 精簡版關鍵段
cat > /var/www/html/centos9/ks.cfg <<'EOF'
#version=RHEL9
auth --enableshadow --passalgo=sha512
url --url=https://192.168.100.10/centos9
text
firstboot --disabled
keyboard us
lang en_US.UTF-8
network --bootproto=dhcp --device=link --activate
rootpw --plaintext StrongPass123!  # 生產請用 --iscrypted 雜湊
timezone Asia/Shanghai --utc
bootloader --location=mbr --boot-drive=sda
clearpart --all --initlabel --drives=sda
autopart --type=lvm
reboot
%packages
@^minimal-environment
%end

%post --interpreter=/bin/bash
# 後安裝腳本:配置 yum 源、SSH 金鑰、監控代理等
systemctl enable sshd
echo "ssh-ed25519 AAAAC3... admin@ops" >> /root/.ssh/authorized_keys
%end
EOF

# 啟用
systemctl enable --now httpd
# /var/lib/tftpboot/pxelinux.cfg/default
default menu.c32
prompt 0
timeout 30
menu title PXE Network Install Menu

label centos9-auto
    menu label ^1. CentOS 9 Stream Auto Install (Kickstart)
    kernel images/centos9/vmlinuz
    append initrd=images/centos9/initrd.img inst.ks=https://192.168.100.10/centos9/ks.cfg inst.repo=https://192.168.100.10/centos9 ip=dhcp

label centos9-manual
    menu label ^2. CentOS 9 Stream Manual Install
    kernel images/centos9/vmlinuz
    append initrd=images/centos9/initrd.img inst.repo=https://192.168.100.10/centos9 ip=dhcp

label local
    menu label ^B. Boot from Local Disk
    localboot 0
# 安裝 grub2-efi
yum install grub2-efi-x64 -y

# 複製 EFI 啟動文件
cp /boot/efi/EFI/centos/grubx64.efi /var/lib/tftpboot/
# 或從 ISO
cp /mnt/EFI/BOOT/grubx64.efi /var/lib/tftpboot/

# 創建 grub.cfg
mkdir -p /var/lib/tftpboot/grub.cfg
cat > /var/lib/tftpboot/grub.cfg <<'EOF'
set timeout=30
menuentry 'CentOS 9 Stream Auto Install' {
    linuxefi /images/centos9/vmlinuz inst.ks=https://192.168.100.10/centos9/ks.cfg inst.repo=https://192.168.100.10/centos9 ip=dhcp
    initrdefi /images/centos9/initrd.img
}
menuentry 'CentOS 9 Stream Manual Install' {
    linuxefi /images/centos9/vmlinuz inst.repo=https://192.168.100.10/centos9 ip=dhcp
    initrdefi /images/centos9/initrd.img
}
EOF

# DHCP UEFI filename
# filename "grubx64.efi";手工維護上百台 PXE 配置不現實。生產環境建議部署:
避坑指南:ISO 必須完整掛載/複製 (別只複製 Packages);Kickst<|repo_suffix|>art clearpart --all --initlabel 會清空所有磁碟,生產環境請精確指定 --drives=sda;UEFI 機器必須提供 grubx64.efi 並配置 DHCP filename "grubx64.efi";內核參數 ip=dhcp 必須在 inst.ks 之前;SELinux 必須在 Kickstart %post 階段 setenforce 1 或配置 selinux --enforcing。