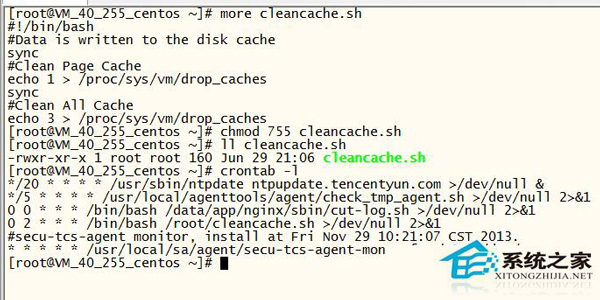
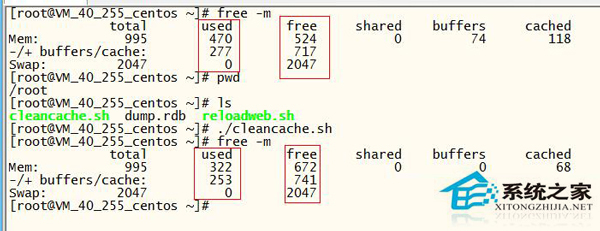
Linux 核心將閒置記憶體用作頁面緩存、目錄項、索引節點以加速 I/O,長時間運行導致可用記憶體極低、觸發 Swap 影響效能。透過 /proc/sys/vm/drop_caches 可手動或定時釋放緩存,本文詳細說明三種釋放等級、手動指令、自動化腳本與 crontab 部署。
| 值 | 動作 | 影響範圍 |
|---|---|---|
| 0 | 不釋放 (預設) | 無 |
| 1 | 釋放頁面緩存 | Page Cache (檔案內容緩存) |
| 2 | 釋放目錄項與索引節點 | dentries + inodes (檔案系統元資料) |
| 3 | 釋放所有上述緩存 | Page Cache + dentries + inodes |
建議:生產環境優先使用 1,僅在記憶體極度緊張時使用 3。釋放前務必執行 sync 將髒頁寫回磁碟,避免資料遺失。
# 釋放頁面緩存
sync && echo 1 > /proc/sys/vm/drop_caches

# 釋放 dentries/inodes
sync && echo 2 > /proc/sys/vm/drop_caches

# 釋放全部 (需 root)
sync && echo 3 > /proc/sys/vm/drop_caches

# sudo 環境寫法
sudo sh -c "echo 3 > /proc/sys/vm/drop_caches"clear_cache.sh#!/bin/bash
# 寫入磁碟確保資料一致性
sync
# 釋放頁面緩存
echo 1 > /proc/sys/vm/drop_caches
sync
# 釋放全部緩存 (視情況啟用)
# echo 3 > /proc/sys/vm/drop_caches
# 記錄清理前後記憶體狀態
free -m >> /var/log/clear_cache.log
date >> /var/log/clear_cache.log
echo "---" >> /var/log/clear_cache.logchmod +x /root/clear_cache.sh
# 每天凌晨 3 點執行
echo "0 3 * * * /root/clear_cache.sh" >> /var/spool/cron/root
# 或使用 crontab -e 編輯innodb_buffer_pool_size、shared_buffers 等專用緩存參數,而非依賴 OS 級清理free -m、vmstat 1、sar -r 觀察 cached/buffers/swap used 趨勢BackTrack Linux 啟用 SSH 服務並產生主機金鑰步驟
Ubuntu 笔记本屏幕亮度无法调节或不保存:Grub 参数 acpi_backlight 与 rc.local 修复
红旗 Linux 6.0 安装 QQ for Linux (tar.gz 版) 与桌面快捷方式创建
Linux 百度網盤 bcloud 常見問題解決指南:Keyring 設定、代理配置、介面差異、CLI 擴展
Linux 檔案管理核心指令實戰:touch 建立/更新時間、mkdir 建立目錄、cp/mv/rm 複製移動刪除、ln 連結
AIX 系統斷電後 HACMP 無法啟動:磁碟識別錯亂完整排查與修復實錄