rsync 核心優勢
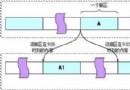
- 增量傳輸:僅傳送差異塊,極快
- 支援 SSH 加密傳輸或 Daemon 模式
- 保留權限、時間、軟鏈接、設備文件等屬性
- 可做鏡像備份、異地災備、集群同步
安裝
# 源碼編譯
wget https://rsync.samba.org/ftp/rsync/src/rsync-3.0.4.tar.gz
tar zxvf rsync-3.0.4.tar.gz
cd rsync-3.0.4
./configure --prefix=/usr/local/rsync
make && make install

# 或套件管理器
yum install rsync      # RHEL/CentOS
apt-get install rsync  # Debian/Ubuntu
Daemon 模式服務端配置 (備份中心)
1. 目錄結構
mkdir -p /usr/local/rsync/{logs,etc,run}
2. 主配置 /usr/local/rsync/etc/rsyncd.conf
uid = root
gid = root
port = 873
use chroot = no
hosts allow = 192.168.9.3
pid file = /usr/local/rsync/run/rsyncd.pid
lock file = /usr/local/rsync/run/rsync.lock
log file = /usr/local/rsync/logs/rsyncd.log
ignore errors

[webroot]
path = /webapps/wwwroot
auth users = backup_user
secrets file = /usr/local/rsync/rsyncd.pass
read only = no
list = yes
3. 密碼文件 (權限 600)
echo "backup_user:StrongPass123" > /usr/local/rsync/rsyncd.pass
chmod 600 /usr/local/rsync/rsyncd.pass
4. 啟動服務
rsync --daemon --config=/usr/local/rsync/etc/rsyncd.conf
# 加入 /etc/rc.local 開機自啟
客戶端同步命令
# 建立密碼文件 (僅含密碼)
echo "StrongPass123" > /root/rsyncd.pass
chmod 600 /root/rsyncd.pass

# 單次同步
rsync -avzP --password-file=/root/rsyncd.pass \
  backup_user@192.168.9.1::webroot /webapps/wwwroot

# 定時任務 (每小時)
echo "0 * * * * root rsync -aqz --password-file=/root/rsyncd.pass backup_user@192.168.9.1::webroot /webapps/wwwroot" > /etc/cron.d/rsync-backup
參數速查
-a:歸檔模式 (保留權限、時間、擁有者等)-v:詳細輸出-z:傳輸壓縮-P:顯示進度 + 斷點續傳--delete:刪除目標端源端不存在的文件 (鏡像模式)--bwlimit=KBPS:限制頻寬
安全加固
# 僅允許特定客戶端 IP 連接 873 端口
iptables -A INPUT -p tcp -s 192.168.9.3 --dport 873 -j ACCEPT
iptables -A INPUT -p tcp --dport 873 -j DROP